Why Hashtable doesn't allow null key/value while Hashmap does.

Why Hashtable doesn't allow null key/value while Hashmap does.


In this post we will learn why Hashtable doesn't allow null key and null value while HashMap does.

How Hashtable and HashMap compute bucket Index.

Before checking this post, I would recommend understanding how HashMap and Hashtable works here


Hashtable and HashMap both uses the given key to compute the bucket index, if the given key is null how will the bucket index be calculated. Also, key can be object and equality of which is determined by calling hashcode and equals on that object, so if the key is null that contract is not fulfilled.

So to summarize, Hashtable doesn't allow null key to compute the bucket index. 

HashMap is newer where it has corrected the issues in Hashtable and allows one null key and value. 
HashMap handles the null key as a special case and it has reserved the index "0" for the null key-value.


Sample Program.

package javabypatel.misc;

import java.util.HashMap;
import java.util.Hashtable;

public class Test {
	public static void main(String[] args) {
		Hashtable<String, String> hashtable = new Hashtable<>();
		//hashtable.put(null, "null"); // throws NPE
		//hashtable.put(null, "null"); // throws NPE

		HashMap<String, String> hashmap = new HashMap<>();
		hashmap.put(null, null);        // No problem
		hashmap.put(null, "my-value");  // No problem

		System.out.println(hashmap.get(null)); // Return value
	}
}


Create Linked Lists of all the nodes at each depth in a binary tree.

Create Linked Lists of all the nodes at each depth in a binary tree.


Creating linked list of Nodes at same level in a Binary tree is same as printing nodes at each level of a Binary tree with only difference is to collect the Nodes in a list for each level instead of printing it.   
 
Consider a below Binary Tree,

         50
       /    \
      /      \
     30       70
   /   \     /  \
  20   40   60  80
 /  \
10  25

Output:
50
30 -> 70
20 -> 40 -> 60 -> 80
10 -> 25


Create Linked Lists of all the nodes at each depth in a binary tree.

Take 2 queues, one for current level and one for next level.

Put the root node in current level and as we work on current level, we will put left and right child into next level queue as that will be the next level we will be working on.

Once we finish the current level queue, that is where our next level queue is ready to process if it is not empty that would be the case for last level which doesn't has any left/right child.

we initialize currentLevel to nextLevel and repeat the steps.


Create Linked Lists of all the nodes at each depth in a binary tree in Java.

package javabypatel.bt;

import java.util.*;

public class LinkedListAtEachDepthOfBinaryTree {
    public static void main(String[] args) {
        Node rootNode = null;
        rootNode = addNode(rootNode, 50);
        rootNode = addNode(rootNode, 30);
        rootNode = addNode(rootNode, 70);
        rootNode = addNode(rootNode, 20);
        rootNode = addNode(rootNode, 40);
        rootNode = addNode(rootNode, 10);
        rootNode = addNode(rootNode, 25);
        rootNode = addNode(rootNode, 60);
        rootNode = addNode(rootNode, 80);

        List<LinkedList<Node>> linkedLists = createLinkedListOfNodesAtEachLevel(rootNode);
    }

    private static List<LinkedList<Node>> createLinkedListOfNodesAtEachLevel(Node root) {
        if (root == null)
            return null;

        List<LinkedList<Node>> linkedLists = new LinkedList<>();

        Queue<Node> currentLevel = new LinkedList<>();
        currentLevel.add(root);
        linkedLists.add(new LinkedList<>());

        Queue<Node> nextLevel = new LinkedList<>();

        while (!currentLevel.isEmpty()) {
            Node node = currentLevel.poll();
            linkedLists.get(linkedLists.size() - 1).add(node);
            System.out.print(node.getData() + ",");

            if (node.getLeft() != null)
                nextLevel.add(node.getLeft());

            if (node.getRight() != null)
                nextLevel.add(node.getRight());

            if (currentLevel.isEmpty() && !nextLevel.isEmpty()) {
                currentLevel = nextLevel;
                nextLevel = new LinkedList<>();
                linkedLists.add(new LinkedList<>());
                System.out.println();
            }
        }
        return linkedLists;
    }

    private static Node addNode(Node rootNode, int i) {
        if (rootNode == null) {
            return new Node(i);
        } else {
            if (i > rootNode.getData()) {
                Node nodeToAdd = addNode(rootNode.getRight(), i);
                rootNode.setRight(nodeToAdd);

            } else {
                Node nodeToAdd = addNode(rootNode.getLeft(), i);
                rootNode.setLeft(nodeToAdd);
            }
        }
        return rootNode;
    }
}
 
package javabypatel.bst;

public class Node {
    private int data;
    private Node left;
    private Node right;

    public Node(int data) {
        this.data = data;
    }

    public int getData() {
        return data;
    }

    public void setData(int data) {
        this.data = data;
    }

    public Node getLeft() {
        return left;
    }

    public void setLeft(Node left) {
        this.left = left;
    }

    public Node getRight() {
        return right;
    }

    public void setRight(Node right) {
        this.right = right;
    }
}


Find Inorder successor of a Node in BST

Find Inorder successor of a Node in BST.


Inorder traversal of a Binary Tree reads a Left most element first then a middle or root element and at last the right most element, so when we say successor of a Node, you have to return the next element of the Node in Inorder traversal.
 
Consider a below BST,

         50
       /    \
      /      \
     30       70
   /   \     /  \
  20   40   60  80
 /  \
10  25

Example:
Inorder Successor of Node 50 is 60
Inorder Successor of Node 25 is 30
Inorder Successor of Node 40 is 50
Inorder Successor of Node 80 is null
Inorder Successor of Node 70 is 80
  

Inorder traversal of a Binary Search Tree always return the data in sorted order. So one way to find is to do a Inorder traversal which would be 

10 20 25 30 40 50 60 70 80

and then you can sequentially search for the next element of the given node which is Inorder successor of a Node. this approach would have O(n) time and space complexity. lets optimize it to O(h) where h is height of tree. (Note: in case of skewed tree it will still be O(n)) 

Inorder Successor In BST

There are 2 case in finding Inorder successor of a Node in BST.

  • Given Node has Right Subtree
  • Given Node doesn't has right subtree

Given Node has Right Subtree, 


In this case, Node 50 has right subtree so the next element would obviously be the left most element in the right sub tree as that how Inorder traversal goes.

Given Node doesn't has right subtree,

In this case (Node 22), where there is no right sub tree, so the next element that is read in inorder successor is the root node 25 and the root node will always encountered when you visit left of any node (this is what is in-order traversal you first visit left most node, so if there is a node and it has left node, you will first visit that and then the root node.)

In above tree, we visited left side 3 times, one from Node 50, one from Node 30 and one from Node 25, so the last left taken is the answer which in this case is 25.

Consider Node 40, the last left you will take is only from Node 50, so Inorder successor of 40 is Node 50.

Inorder successor of Binary Search Tree in Java.

package javabypatel.bst;

public class InOrderSuccessor {
    public static void main(String[] args) {
        new InOrderSuccessor();
    }

    public InOrderSuccessor() {
        Node rootNode = null;
        rootNode = addNode(rootNode, 50);
        rootNode = addNode(rootNode, 30);
        rootNode = addNode(rootNode, 70);
        rootNode = addNode(rootNode, 20);
        rootNode = addNode(rootNode, 40);
        rootNode = addNode(rootNode, 10);
        rootNode = addNode(rootNode, 25);
        rootNode = addNode(rootNode, 60);
        rootNode = addNode(rootNode, 80);

        System.out.println(inorderSuccessor(rootNode, 70, null).getData());
    }

    private Node inorderSuccessor(Node root, int k, Node lastLeftNodeVisited) {
        if (root == null) {
            return root;
        }

        if (root.getData() == k) {
            if (root.getRight() != null) {
                return findSmallestInLeft(root.getRight());
            } else {
                return lastLeftNodeVisited;
            }
        }

        if (k < root.getData()) {
            return inorderSuccessor(root.getLeft(), k, root);
        } else {
            return inorderSuccessor(root.getRight(), k, lastLeftNodeVisited);
        }
    }

    private Node findSmallestInLeft(Node root) {
        if (root == null || root.getLeft() == null) {
            return root;
        }

        return findSmallestInLeft(root.getLeft());
    }

    private Node addNode(Node rootNode, int i) {
        if (rootNode == null) {
            return new Node(i);
        } else {
            if (i > rootNode.getData()) {
                Node nodeToAdd = addNode(rootNode.getRight(), i);
                rootNode.setRight(nodeToAdd);

            } else {
                Node nodeToAdd = addNode(rootNode.getLeft(), i);
                rootNode.setLeft(nodeToAdd);
            }
        }
        return rootNode;
    }
}
 
package javabypatel.bst;

public class Node {
    private int data;
    private Node left;
    private Node right;

    public Node(int data) {
        this.data = data;
    }

    public int getData() {
        return data;
    }

    public void setData(int data) {
        this.data = data;
    }

    public Node getLeft() {
        return left;
    }

    public void setLeft(Node left) {
        this.left = left;
    }

    public Node getRight() {
        return right;
    }

    public void setRight(Node right) {
        this.right = right;
    }
}


Min Heap and Max Heap in Java

Min Heap and Max Heap in Java.


In this post we will see what is Min Heap, Max Heap, the operation it supports and the time and space complexity of each operation.

Complete Binary Tree.

Min Heap and Max Heap uses the concept of Complete Binary Tree.

A heap (Binary heap here) is a complete binary tree which satisfies below property,

Min-heap: the value of each node is greater than or equal to the value of its parent, that is the element with minimum value is always at the root. 
Max-heap: the value of each node is less than or equal to the value of its parent, that is the element with maximum value is always at the root.

If we represent the array as Complete Binary tree, how is left child and right child index calculated?
Check this link which explains heap concepts in detail Heap Sort Algorithm

In this post, we will implement Min Heap and the operation it support would be,
  • add - this will add a element to a heap
  • remove - this will remove a element from a heap
  • peek - this will give you a minimum element in a heap
Time complexity of each operation,
  • add - O(log n)
  • remove - O(log n)
  • peek - O(1)
Since in addition/removal, new element added/removed could disturb the heap property so we have to scan all the elements belonging to height of binary tree which take Log n operation.

Min Heap in Java


package javabypatel.heap;

public class MinHeap {
    private int[] heap;
    private int size;
    private int currentIndex=-1;

    public MinHeap(int size) {
        this.heap = new int[size];
        this.size = size;
    }

    public int remove() {
        if (currentIndex < 0) {
            throw new RuntimeException("Heap is empty");
        }
        int temp = heap[0];
        heap[0] = heap[currentIndex];
        currentIndex--;
        bubbleDown(0);
        return temp;
    }

    public int peek() {
        if (currentIndex < 0) {
            throw new RuntimeException("Heap is empty");
        }
        return heap[0];
    }

    public void add(int data) {
        if ((currentIndex + 1) >= size) {
            throw new RuntimeException("Heap full");
        }

        heap[++currentIndex] = data;
        bubbleUp(currentIndex);
    }

    private int getLeftChildIndex(int index) {
        return index * 2 + 1;
    }

    private int getRightChildIndex(int index) {
        return index * 2 + 2;
    }

    private int getParentIndex(int index) {
        return (index - 1) / 2;
    }

    private boolean isParentPresent(int index) {
        return getParentIndex(index) >= 0;
    }

    private void bubbleUp(int index) {
        if (!isParentPresent(index)) {
            return;
        }

        int parentIndex = getParentIndex(index);

        if (heap[index] < heap[parentIndex]) {
            swap(index, parentIndex);
            bubbleUp(parentIndex);
        }
    }

    private void bubbleDown(int index) {
        int left = getLeftChildIndex(index);
        int right = getRightChildIndex(index);

        int minIndex = index;
        if (left <= currentIndex && heap[left] < heap[minIndex]) {
            minIndex = left;
        }
        if (right <= currentIndex && heap[right] < heap[minIndex]) {
            minIndex = right;
        }

        if (index != minIndex) {
            swap(index, minIndex);
            bubbleDown(minIndex);
        }
    }

    private void swap(int index1, int index2) {
        int temp = heap[index1];
        heap[index1] = heap[index2];
        heap[index2] = temp;
    }
}

 
package javabypatel.heap;

public class MinHeapMain {
    public static void main(String[] args) {
        MinHeap minHeap = new MinHeap(10);
        minHeap.add(5);
        minHeap.add(1);
        System.out.println(minHeap.peek());
        minHeap.remove();
        minHeap.add(4);
        System.out.println(minHeap.peek());
        minHeap.add(2);
        System.out.println(minHeap.peek());
    }
}
Output: 

Max Heap is very similar to Min Heap, except we keep the maximum at the top.

Max Heap in Java

package javabypatel.heap;

public class MaxHeap {
    private int[] heap;
    private int size;
    private int currentIndex=-1;

    public MaxHeap(int size) {
        this.heap = new int[size];
        this.size = size;
    }

    public int remove() {
        if (currentIndex < 0) {
            throw new RuntimeException("Heap is empty");
        }
        int temp = heap[0];
        heap[0] = heap[currentIndex];
        currentIndex--;
        bubbleDown(0);
        return temp;
    }

    public int peek() {
        if (currentIndex < 0) {
            throw new RuntimeException("Heap is empty");
        }
        return heap[0];
    }

    public void add(int data) {
        if ((currentIndex + 1) >= size) {
            throw new RuntimeException("Heap full");
        }

        heap[++currentIndex] = data;
        bubbleUp(currentIndex);
    }

    private int getLeftChildIndex(int index) {
        return index * 2 + 1;
    }

    private int getRightChildIndex(int index) {
        return index * 2 + 2;
    }

    private int getParentIndex(int index) {
        return (index - 1) / 2;
    }

    private boolean isParentPresent(int index) {
        return getParentIndex(index) >= 0;
    }

    private void bubbleUp(int index) {
        if (!isParentPresent(index)) {
            return;
        }

        int parentIndex = getParentIndex(index);

        if (heap[index] > heap[parentIndex]) {
            swap(index, parentIndex);
            bubbleUp(parentIndex);
        }
    }

    private void bubbleDown(int index) {
        int left = getLeftChildIndex(index);
        int right = getRightChildIndex(index);

        int minIndex = index;
        if (left <= currentIndex && heap[left] > heap[minIndex]) {
            minIndex = left;
        }
        if (right <= currentIndex && heap[right] > heap[minIndex]) {
            minIndex = right;
        }

        if (index != minIndex) {
            swap(index, minIndex);
            bubbleDown(minIndex);
        }
    }

    private void swap(int index1, int index2) {
        int temp = heap[index1];
        heap[index1] = heap[index2];
        heap[index2] = temp;
    }

}
package javabypatel.heap;

public class MaxHeapMain {
    public static void main(String[] args) {
        MaxHeap maxHeap = new MaxHeap(10);
        maxHeap.add(5);
        maxHeap.add(1);
        System.out.println(maxHeap.peek());
        maxHeap.remove();
        System.out.println(maxHeap.peek());
        maxHeap.add(15);
        System.out.println(maxHeap.peek());
        maxHeap.add(20);
        System.out.println(maxHeap.peek());
    }
}
Output: 
15 
20

Find the angle between the hour and minute hands in Java

Find the angle between the hour and minute hands on an analog clock.


Given the time, calculate the smaller angle between the hour and minute hands on an analog clock in Java.

Java Program to find angle between hour and minute hand.


In 60 mins, clock minute hand takes 360 degree. so for 1 min = 360/60 = 6 degree.
In 12 hours, clock hour hand takes 360 degree. so for 1 hour = 360/12 = 30 degree 

But when it is 1.20, hour hand doesn't be on exact 1, and would be slightly crossed 1 (when it is 1.30, hour hand would be in between 1 and 2.) 
So we need to find out the exact position of the hour hand and the angle it covered, that is you need to find the angle hour hand makes for each minute passes. 

We already know 1 hour angle = 30 degree 
In 1 hour, we have 60 minutes, so in each minute, how much angle hour hand makes = 30/60 = 1/2.
 
package javabypatel.misc;

public class FindAngle {
    public static void main(String[] args) {
        System.out.println(findAngle(12, 25));
    }

   public static double findAngle(int hour, int minute) {
        // in 60 mins, it takes 360 degree. so for a 1 min = 360/60 = 6 degree
        double minAngle = minute * 6;

        // in 12 hours, it takes 360 degree. so for 1 hour = 360/12 = 30 degree
       double hourAngle = hour * 30;

        //but when it is 1.20, hour hand doesn't be on exact 1, and would be slightly crossed 1 (when it is 1.30, hour hand would be in between 1 and 2.)
        //So you need to find out the exact position of the hour hand and the angle it covered between a single hour.
        //that is you need to find the angle hour hand makes for each minute passes.
        //we already know 1 hour angle = 30 degree
        //In 1 hour, we have 60 minutes, so in each minute, how much angle hour hand makes = 30/60 = 1/2.
        double hourAngleForEachMinute = minute/2.0; //minute * 1/2; (divided by 2.0 to make it divide in double context)

        //Final hour angle would be hourAngle + hourAngleForEachMinute
        double finalHourAngle = hourAngle + hourAngleForEachMinute;

        double angle = Math.abs(finalHourAngle - minAngle);

        //analog clock is round, so clock hands make two angles, one in interior and one is exterior, Since we are told to return smaller angle we return minimum one.
        return Math.min(angle, 360-angle);
    }
}


Visitor Design Pattern real world example in Java

Visitor Design Pattern real world example in Java


In this post we will see when to use visitor design pattern and the real life example of visitor design pattern in Java.

Scenario for understanding Visitor Design Pattern.

Consider a scenario below,

You own a small supermarket selling items of multiple category ranging from Electronics, Hardware, Plastic, Packaged food, Fresh fruit etc.
  • Supermarket have return policy based on the item category.
  • Supermarket provide discounts based on the item category.
  • Supermarket have different shipping vendor based on item category. (say you purchased an item from e-commerce company like Amazon and now you want to return it. In some countries, they arrange a person to visit your place for picking the item. In some countries, they email you pre-paid shipping label from standard transportation companies like Canada post, UPS etc and you have to pack the item, stick the shipping label and handover to the shipping provider.)
too much explanation... :) lets look into how above scenario can be designed without using visitor design pattern and then we will see benefits of visitor pattern and how it helps in maintaining Open/Closed and Single Responsibility Principle.


For each different category we have to apply different rules in terms of discounts, return policy and shipping vendor.

Problem without Visitor Design Pattern.


We have multiple product category and each have the name, discount, return policy and shipping vendor. we would design something like below,

interface ProductCategory {
String getName();
int discount();
String shippingVendor();
int returnPolicy();
}

class Plastic implements ProductCategory {
@Override
public String getName() {
return "Plastic";
}

@Override
public int discount() {
return 5;
}

@Override
public String shippingVendor() {
return "UPS";
}

@Override
public int returnPolicy() {
return 30;
}
}

class Electronics implements ProductCategory {
@Override
public String getName() {
return "Electronics";
}

@Override
public int discount() {
return 10;
}

@Override
public String shippingVendor() {
return "Canada Post";
}

@Override
public int returnPolicy() {
return 60;
}
}

Now, Imagine you have to add one more rule say packaging type for each category. what we will do is modify the interface to add one more method, 

interface ProductCategory {
String getName();
int discount();
String shippingVendor();
int returnPolicy();
String packingType(); //added
}
You have to modify all the implementation to have this packing type. which is against Open/Closed principle.

Also, responsibility like Discounts, return policy are segregated into each implementation and not at one place.
  
Lets see the sample implementation with Visitor Design pattern now,

Visitor Design Pattern.

With Visitor Design pattern, all such rules that can be applied to each product category is separated from category itself.

Example: Electronics category will not have any implementation details for discounts, return policy, shipping vendor etc as those are the rules that could be added/removed to each category and could change.

so what we would be doing is to allow Electronics category having a visitor called ProductCategoryVisitor (which could be of type DiscountVisitor, ShippingVendorVisitor, ReturnPolicyVisior etc).  

package fresh.armaan;

public class VisitorDesignPattern {

public static void main(String[] args) {
ProductCategoryVisitor discountVisitor = new DiscountVisitor();
ProductCategoryVisitor returnPolicyVisitor = new ReturnPolicyVisitor();

//Plastic
ProductCategory plasticCategory = new Plastic();
System.out.println("Category Name : " + plasticCategory.getName());
System.out.println("Discounts on Plastic Category : " + plasticCategory.visit(discountVisitor) + "%");
System.out.println("Return Policy on Plastic Category : " + plasticCategory.visit(returnPolicyVisitor) + " days");

System.out.println("------------------");

//Electronics
ProductCategory electronicsCategory = new Electronics();
System.out.println("Category Name : " + electronicsCategory.getName());
System.out.println("Discounts on Electronics Category : " + electronicsCategory.visit(discountVisitor) + "%");
System.out.println("Return Policy on Electronics Category : " + electronicsCategory.visit(returnPolicyVisitor) + " days");
}
}

interface ProductCategory {
String getName();
String visit(ProductCategoryVisitor visitor);
}

class Plastic implements ProductCategory {
@Override
public String getName() {
return "Plastic";
}

@Override
public String visit(ProductCategoryVisitor visitor) {
return visitor.visit(this);
}
}

class Electronics implements ProductCategory {
@Override
public String getName() {
return "Electronics";
}

@Override
public String visit(ProductCategoryVisitor visitor) {
return visitor.visit(this);
}
}

interface ProductCategoryVisitor {
String visit(Electronics electronics);
String visit(Plastic plastic);
}

class DiscountVisitor implements ProductCategoryVisitor {

@Override
public String visit(Electronics electronics) {
return "10";
}

@Override
public String visit(Plastic plastic) {
return "5";
}
}

class ReturnPolicyVisitor implements ProductCategoryVisitor {

@Override
public String visit(Electronics electronics) {
return "60";
}

@Override
public String visit(Plastic plastic) {
return "30";
}
}
 
Output:
Category Name : Plastic
Discounts on Plastic Category : 5%
Return Policy on Plastic Category : 30 days
------------------
Category Name : Electronics
Discounts on Electronics Category : 10%
Return Policy on Electronics Category : 60 days
Use visitor pattern when you have a fairly stable class hierarchy (like in our example we have product category Electronics, Plastic etc which changes but not very frequently), but have changing requirements of what needs to be done with that hierarchy (in our example each product category have discounts, return policy, shipping vendor and so on and that could add/remove/change very often), in that case visitor pattern is helpful.

You may also like to see


Advanced Java Multithreading Interview Questions & Answers

Type Casting Interview Questions and Answers In Java?

Exception Handling Interview Question-Answer

Method Overloading - Method Hiding Interview Question-Answer

How is ambiguous overloaded method call resolved in java?

Method Overriding rules in Java

Interface interview questions and answers in Java


Enjoy !!!! 
If you find any issue in post or face any error while implementing, Please comment.

Swagger OpenAPI REST Java Example using Guice and Jersey

Swagger OpenAPI REST API Java Example using Guice and Jersey


In this post we will see how to integrate Swagger in Guice and Jersey to dynamically generate OpenAPI REST endpoint documentation.

Sample project uses below libraries,
1. Google Guice
2. Jersey
2. Grizzly server
3. Swagger OpenAPI Annotations  

Sample project to demonstrate OpenAPI Swagger configuration in Guice grizzly jersey example.

We are going to write a small hello world maven application containing one REST api endpoint and will generate OpenAPI swagger documentation for it.

We will be mostly using Swagger Java Annotations for generating the Resource description.

Sample project generates OpenAPI swagger documentation in both JSON and YAML format.

Download the complete application from here

Dependencies: pom.xml

<?xml version="1.0" encoding="UTF-8"?>
<project xmlns="http://maven.apache.org/POM/4.0.0"
xmlns:xsi="http://www.w3.org/2001/XMLSchema-instance"
xsi:schemaLocation="http://maven.apache.org/POM/4.0.0 http://maven.apache.org/xsd/maven-4.0.0.xsd">
<modelVersion>4.0.0</modelVersion>

<groupId>com.javabypatel</groupId>
<artifactId>guice-grizzly-jersey-openapi-swagger-example</artifactId>
<version>1.0-SNAPSHOT</version>

<properties>
<grizzly.version>2.3.16</grizzly.version>
<jersey.version>2.30</jersey.version>
<guice.version>4.2.2</guice.version>
<guice.bridge>2.5.0-b61</guice.bridge>
<swagger.version>2.1.5</swagger.version>
<maven.compiler.source>11</maven.compiler.source>
<maven.compiler.target>11</maven.compiler.target>
</properties>

<dependencies>
<!-- Guice dependencies -->
<dependency>
<groupId>com.google.inject</groupId>
<artifactId>guice</artifactId>
<version>${guice.version}</version>
</dependency>
<dependency>
<groupId>org.glassfish.hk2</groupId>
<artifactId>guice-bridge</artifactId>
<version>${guice.bridge}</version>
</dependency>

<!-- Jersey dependencies -->
<dependency>
<groupId>org.glassfish.jersey.bundles</groupId>
<artifactId>jaxrs-ri</artifactId>
<version>${jersey.version}</version>
</dependency>
<dependency>
<groupId>org.glassfish.jersey.containers</groupId>
<artifactId>jersey-container-grizzly2-http</artifactId>
<version>${jersey.version}</version>
</dependency>
<dependency>
<groupId>org.glassfish.jersey.ext</groupId>
<artifactId>jersey-bean-validation</artifactId>
<version>${jersey.version}</version>
</dependency>
<dependency>
<groupId>org.glassfish.jersey.inject</groupId>
<artifactId>jersey-hk2</artifactId>
<version>${jersey.version}</version>
</dependency>

<!-- swagger dependencies -->
<dependency>
<groupId>io.swagger.core.v3</groupId>
<artifactId>swagger-jaxrs2</artifactId>
<version>${swagger.version}</version>
</dependency>
<dependency>
<groupId>io.swagger.core.v3</groupId>
<artifactId>swagger-annotations</artifactId>
<version>${swagger.version}</version>
</dependency>
<dependency>
<groupId>io.swagger.core.v3</groupId>
<artifactId>swagger-core</artifactId>
<version>${swagger.version}</version>
</dependency>
</dependencies>

</project>

openapi-configuration.json

This file contains the OpenAPI high-level resource description. you can describe the same using Swagger Annotations.

{
"resourcePackages": [
"com.javabypatel.resource"
],
"prettyPrint": true,
"cacheTTL": 0,
"openAPI": {
"info": {
"version": "1.0.0",
"title": "Guice Grizzly Jersey Openapi Swagger Example API",
"description": "OpenAPI swagger configuration example in sample project that uses Guice, Grizzly, Jersey.",
"contact": {
"email": "jayeshmaheshpatel@gmail.com"
},
"license": {
"name": "MIT License",
"url": "https://en.wikipedia.org/wiki/MIT_License"
}
},
"servers": [
{
"url": "http://localhost:8080/OpenAPIExample/",
"description": "Guice Grizzly Jersey Openapi Swagger Example API server"
}
]
}
}

Sample REST API Endpoint:

package com.javabypatel.resource;

import com.javabypatel.model.GreetResponse;
import io.swagger.v3.oas.annotations.Operation;
import io.swagger.v3.oas.annotations.Parameter;
import io.swagger.v3.oas.annotations.enums.ParameterIn;
import io.swagger.v3.oas.annotations.media.ArraySchema;
import io.swagger.v3.oas.annotations.media.Content;
import io.swagger.v3.oas.annotations.media.Schema;
import io.swagger.v3.oas.annotations.responses.ApiResponse;

import javax.ws.rs.BadRequestException;
import javax.ws.rs.GET;
import javax.ws.rs.Path;
import javax.ws.rs.Produces;
import javax.ws.rs.core.Context;
import javax.ws.rs.core.MediaType;
import javax.ws.rs.core.Response;
import javax.ws.rs.core.UriInfo;

@Path("greet")
public class GreetResource {

private static final String GREET_MESSAGE = "Hello";

@GET
@Produces(MediaType.APPLICATION_JSON)
@Operation(
summary = "This is a sample test API to greet user.",
parameters = {
@Parameter(in = ParameterIn.QUERY, name = "name")
},
responses = {
@ApiResponse(
responseCode = "200",
description = "Greeted successfully.",
content = @Content(
mediaType = MediaType.APPLICATION_JSON,
array = @ArraySchema(schema = @Schema(implementation = GreetResponse.class))
)
),
@ApiResponse(
responseCode = "400",
description = "Bad request. Request is not well formed."
)
}
)
public Response greet(@Context UriInfo uriInfo) {
if (!uriInfo.getQueryParameters().containsKey("name")) {
throw new BadRequestException("'name' query parameter is missing.");
}
return Response
.ok()
.entity(new GreetResponse(GREET_MESSAGE + " " + uriInfo.getQueryParameters().getFirst("name")))
.build();
}
}

Generated OpenAPI documentation - JSON

{
"openapi" : "3.0.1",
"info" : {
"title" : "Guice Grizzly Jersey Openapi Swagger Example API",
"description" : "OpenAPI swagger configuration example in sample project that uses Guice, Grizzly, Jersey.",
"contact" : {
"email" : "jayeshmaheshpatel@gmail.com"
},
"license" : {
"name" : "MIT License",
"url" : "https://en.wikipedia.org/wiki/MIT_License"
},
"version" : "1.0.0"
},
"servers" : [ {
"url" : "http://localhost:8080/OpenAPIExample/",
"description" : "Guice Grizzly Jersey Openapi Swagger Example API server"
} ],
"paths" : {
"/greet" : {
"get" : {
"summary" : "This is a sample test API to greet user.",
"operationId" : "greet",
"parameters" : [ {
"name" : "name",
"in" : "query",
"schema" : {
"type" : "string"
}
} ],
"responses" : {
"200" : {
"description" : "Greeted successfully.",
"content" : {
"application/json" : {
"schema" : {
"type" : "array",
"items" : {
"$ref" : "#/components/schemas/GreetResponse"
}
}
}
}
},
"400" : {
"description" : "Bad request. Request is not well formed."
}
}
}
}
},
"components" : {
"schemas" : {
"GreetResponse" : {
"type" : "object",
"properties" : {
"message" : {
"type" : "string"
}
}
}
}
}
}

Generated OpenAPI documentation - YAML

openapi: 3.0.1
info:
title: Guice Grizzly Jersey Openapi Swagger Example API
description: "OpenAPI swagger configuration example in sample project that uses\
\ Guice, Grizzly, Jersey."
contact:
email: jayeshmaheshpatel@gmail.com
license:
name: MIT License
url: https://en.wikipedia.org/wiki/MIT_License
version: 1.0.0
servers:
- url: http://localhost:8080/OpenAPIExample/
description: Guice Grizzly Jersey Openapi Swagger Example API server
paths:
/greet:
get:
summary: This is a sample test API to greet user.
operationId: greet
parameters:
- name: name
in: query
schema:
type: string
responses:
"200":
description: Greeted successfully.
content:
application/json:
schema:
type: array
items:
$ref: '#/components/schemas/GreetResponse'
"400":
description: Bad request. Request is not well formed.
components:
schemas:
GreetResponse:
type: object
properties:
message:
type: string

You can download the full application here:

Create Docker Image of Spring Boot Microservices using Fabric8 maven plugin.

Create Docker Image of Spring Boot Microservices using Fabric8 maven plugin.


In this post we will see how to create a Docker image of Spring Boot Microservice using Fabric8 maven plugin.

Steps,

1. First we will create a Spring Boot Microservice with some REST endpoints
2. Run the Spring Boot Microservice and access the endpoints to see if it works.
3. Create the docker image of a Microservice created above.
4. Run the Spring Boot Microservice Docker image to see if we can access the REST endpoints. 

Spring Boot Microservices Hello World Example 

Download the Spring Boot Microservices Hello World Example from GitHub:
spring-boot-docker-hello-world

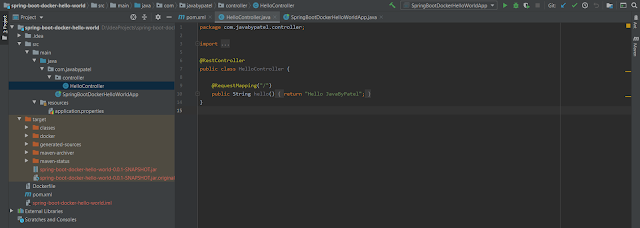
Layout of the application is as shown below,
spring-boot-docker-fabric8-maven-plugin-example

It is a Spring Boot Microservice exposing only one endpoint "/"

resources/application.properties
Microservice contains application.properties file through which we can define the application context, change the default post on which application is going to deploy. 
In this example we changed the default application port to 8085

Dockerfile
Microservice also contains Dockerfile which contains instructions for the Docker as how to create the image of this Microservice.
FROM adoptopenjdk/openjdk11-openj9:alpine
ADD target/${project.build.finalName}.jar /myapp/${project.build.finalName}.jar
EXPOSE 8080
ENTRYPOINT java -jar /myapp/${project.build.finalName}.jar
Get the base image adoptopenjdk/openjdk11-openj9:alpine, 
Add our microservice jar inside docker image file directory at location "/myapp",
Expose the container port 8080 (this means Docker image container will listen on port 8080)
Start our Microservice jar

Run the Spring Boot Microservices Hello World Example 

Run the SpringBootDockerHelloWorldApp file as Java application.

When you see below logs in console, 
[main] o.s.b.w.embedded.tomcat.TomcatWebServer  : Tomcat started on port(s): 8085 (http) 
[main] c.j.SpringBootDockerHelloWorldApp : Started SpringBootDockerHelloWorldApp 

Go to browser and hit url http://localhost:8085/, you will see response as "Hello JavaByPatel"

Create the Docker image of Spring Boot Microservices using Fabric8 maven plugin

Run the command,

1. mvn clean install
This will create the target directory and place the generated jar of our Microservice inside directory with name "spring-boot-docker-hello-world-0.0.1-SNAPSHOT.jar"

2. mvn fabric8:build
This will create the docker image of the Microservice inside the running Docker.
run the command below to see existing "docker images"

spring-boot-docker-image-example

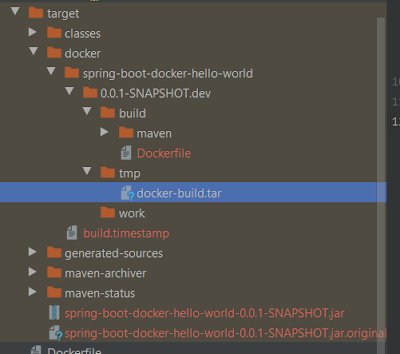
Inside the target directory, you would see a new folder name Docker containing image tar file.

docker image tar file


Running the Docker image


Run the command,

docker run -p 8085:8085 spring-boot-docker-hello-world:0.0.1-SNAPSHOT.dev

Here we are saying, map the container port 8085 to Tomcat port 8085 running inside container.

spring-boot-docker-hello-world

Go to browser and hit "http://localhost:8085/", it should give the response as "Hello JavaByPatel"

In case if the URL is not reachable, check the IP of docker by issuing the command(I was running Docker toolbox on windows and has to provide IP instead of localhost), 

$ docker-machine ip
192.168.98.112

Go to browser and hit, "http://192.168.98.112:8085/", It should work now.